
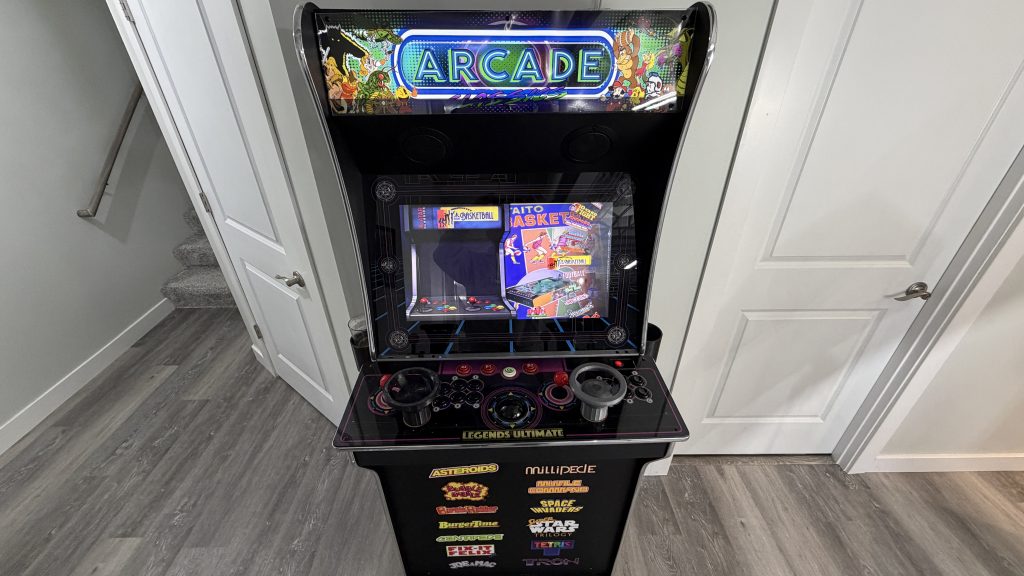
My AtGames Legends Ultimate Setup: Upgrades That Make a Home Arcade More Fun
The AtGames Legends Ultimate is a great starting point for a home arcade. It combines two-player controls, a trackball, and spinners in one cabinet, giving you different ways to play a wide variety of arcade games.
Mine has become an ongoing project. I’ve added CoinOpsX, a riser, cup holders, steering wheels for the spinners, and a custom marquee. More recently, I upgraded the buttons and added bat tops to the joysticks.
Some of these changes improve comfort. Others add convenience or personality. Together, they’ve made this a machine I enjoy using even more.
Here’s a look at my setup, what I’ve changed, and which upgrades have made the biggest difference.
Why I Like the AtGames Legends Ultimate
The control panel is a big part of this cabinet’s appeal. You have two sets of joysticks and action buttons for multiplayer games, plus a trackball and two spinners.
Having those different controls opens up more ways to play. A joystick works well for plenty of games, but using a trackball or spinner for a game designed around one adds to the experience.
I also like standing at an actual arcade cabinet. The screen, controls, and cabinet make playing feel different from sitting on the couch with a controller.
My machine runs CoinOpsX from a USB drive. That’s part of my current setup, while the physical upgrades below help make the cabinet more comfortable and enjoyable to use.
Raising the Cabinet to a Comfortable Height
One of my simplest upgrades was building a riser from 2-by-4s and plywood, then painting it black to match the cabinet.
The purpose was straightforward: bring the controls up to a more comfortable height for me.
It doesn’t need lights or fancy graphics to be useful. If you find yourself bending over your arcade controls, getting the cabinet to a comfortable height can make a noticeable difference during longer sessions.
Cup Holders That Use the Existing Mounting Holes
Cup holders might not sound like an exciting arcade upgrade, but I use them every time I have a drink nearby.
My 3D-printed holders mount using existing holes in the cabinet, so I didn’t need to drill additional holes. They give drinks a dedicated spot instead of leaving them sitting on the control panel.
They’re a small addition, but a useful one—and a good example of how 3D printing can make a home arcade more convenient.
[Download the cup holder STL files]
Steering Wheels for the Spinners
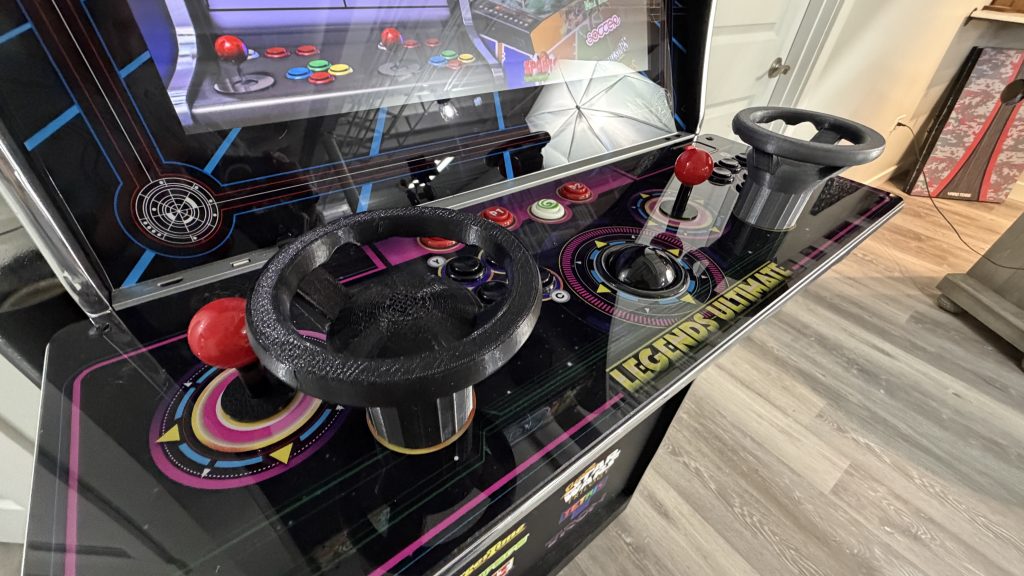
The Legends Ultimate already has two spinners. I added 3D-printed steering wheels to make them more enjoyable for driving games.
Super Off Road is a favorite example. Having a wheel to grab adds to the fun and gives the controls more of that arcade feel.
These are also among the most distinctive changes to my cabinet. They make use of controls the machine already has, while changing how I interact with them.
[Download the spinner steering wheel STL files]
A Custom Marquee
I made a custom marquee to give the cabinet some personality.
This upgrade is mostly about appearance, but the marquee is one of the first things you notice when looking at an arcade machine. Changing it helps make the cabinet feel like my own.
Am I completely happy with mine? Not quite. I’ll probably replace it at some point, and I’m considering changing the screen bezel as well.
That’s part of the appeal of a project like this. You can enjoy the machine as it is and keep making changes along the way.
Eclipse LED Buttons: Better Feel and a Great Look
My latest upgrades focused on the controls themselves.
Some of the original buttons were sticking, so I installed Arcade Renovations Eclipse LED buttons with Zippy 50g microswitches. The improvement in gameplay was immediately noticeable: smoother presses, more consistent return, and less frustration.
The Eclipse buttons have black centers with illuminated rings. I like that look because the lighting accents the buttons without making the entire button glow.
My current setup has:
- Six blue-ring action buttons on the left.
- Six red-ring action buttons on the right.
- Two white-ring buttons for additional controls.
I kept the original Player 1 and Player 2 buttons, although I may change those later.
Links to the buttons
- Blue Eclipse LED buttons with black centers
- Red Eclipse LED buttons with black centers
- White Eclipse LED buttons with black centers
For the same switch choice, select Zippy 50g .187-inch microswitches on the button pages.
Powering the Button Lights from the Cabinet
To power the LED rings, I added a wiring harness and DC splitter:
The original control wiring handles the button presses. The additional harness connects power to the LEDs, while the splitter lets the lighting share the cabinet’s existing power source.
That means I don’t need another power adapter plugged into the wall. I drilled an access hole to route the connection for my installation.
If you’re doing this upgrade, check voltage, polarity, and connector compatibility for your particular setup before connecting power.
Bat Tops for a More Comfortable Grip
I also replaced the joystick ball tops with bat tops.
This comes down to personal preference, but I like the taller grip. It feels more comfortable in my hand and gives the controls more of the traditional arcade feel I wanted.
The joystick mechanism underneath stays the same. You’re changing the part you hold, and for me, that small change was worthwhile.
Find the bat tops I used on Amazon
The new buttons and bat tops work well together. The buttons feel smoother, the joysticks are more comfortable to grip, and the whole panel is more enjoyable to use.
[Embed button and bat top upgrade video here: https://youtu.be/TX3jcQUuZF4]
That video includes a quick walkthrough of replacing the buttons, adding the LED wiring, and swapping the joystick tops.
Which Upgrades Made the Biggest Difference?
Each modification serves a different purpose:
| Upgrade | What it adds |
|---|---|
| Riser | A more comfortable control-panel height |
| Cup holders | A dedicated place for drinks |
| Spinner steering wheels | A more enjoyable grip for driving games |
| Custom marquee | A personalized cabinet appearance |
| Eclipse buttons and Zippy switches | Smoother, more consistent button action |
| LED button lighting | Illuminated rings around the black buttons |
| Bat tops | A joystick grip I find more comfortable |
The buttons made the biggest immediate difference during gameplay because they solved the sticking problem. The riser helps with comfort, while the cup holders and steering wheels are additions I appreciate whenever I use them.
The marquee is the change I’m most likely to revisit. Apparently, a home arcade is never completely finished.
Making the Legends Ultimate My Own
What I like about this setup is that I haven’t needed to change everything at once. The Legends Ultimate provides the cabinet and a versatile set of controls, and I’ve added things as I’ve found ways to improve my experience.
Some upgrades are practical. Some are just fun. All of them help make the machine feel more like my arcade.
Would you like to see this AtGames Legends Ultimate setup compared with something like a Pandora Box? Leave a comment and tell me what you’d want compared: controls, games, setup, or overall value.
Disclosure: Some links may be affiliate links. As an Amazon Associate, I earn from qualifying purchases.